Thursday, April 29, 2010

Recycled toys rock band

My daughter kinda wants to be a rock star. I'm kinda okay with that since I'm a singer and a lover of music. And, she looks cute in the shades. Here are a couple of Musical instrument ideas, but I'm sure there are more to follow.

End of easter Musical Shaker
Put some dried beans in those old eggs and give them a new life! (You can tape them up of you're afraid of a mess or little ones eating choking on them)

And a classic Ice Cream bucket drum with chopstick drumsticks. Doesn't my little drummer look cool?

Posted by Picasa

Friday, April 23, 2010

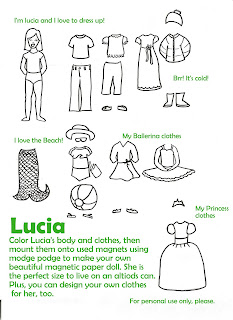
Lucia's print out

Here is your belated Earth Day present. To use this picture for your altiods can, save the image to your computer and print it out to be 8 1/2 by 11. That way, Lucia will be just big enough to fit on the can's front. I know she looks homemade (because she is), but I hope you love her as much as we do!

Thursday, April 22, 2010

Altiods can magnetic paper doll- Happy Earth Day!


Dear Readers,
Happy Earth Day! Earth day is one of our family's favorite holidays! For my Earth Day gift to you, I am going to give you my best recycled toy idea yet! (And hopefully soon it will come with a template!) This would be the perfect toy to keep in your purse for Errand Emergencies when kids need a little extra entertainment. It is a magnetic dress-up doll with its own built in carrying case! I'll have to warn you, though, that I learned some Mod Podge lessons the hard way and my paper got bubbly and torn. I'm sure yours will turn out better!

Magnetic Paper doll with Altoids can case

Skills Needed: coloring, cutting
Time needed: an hour
Materials needed:
  • empty and clean Altoids can
  • unwanted flat magnets (the kind that businesses use to market themselves are perfect. About the size of the business card and very cuttable.)
  • crayons or colored pencils
  • Mod Podge
  • scissors
  • paint brush
  • scrap of fun paper the size of the top of the Altoids can
  • Print out of Lucia or another paper doll you love that is 3 1/2 inches tall
Instructions:
  1. print out "Lucia" my handmade paper doll or shrink your own favorite paper doll to be around 3 1/2 inches tall(To print out Lucia, save the picture here to your computer, then print at full page size).
  2. Color in her beautiful clothes. Use crayons or colored pencils, but don't use washable markers because they'll bleed when you put on the Mod Podge later. And don't use permanent markers because they just bleed. Don't worry if the colors go outside the lines because you'll be cutting them, anyway. (Can you tell that my 3 year old painted the mermaid tail?) Design more if you're feeling extra creative!
  3. cut Lucia out on the lines. Cut her clothes out loosely, leaving a little white space around the edges.
  4. Trace the top of the altoids can onto the back side of your scrap of pretty paper. Make sure there's not any overhang.
  5. apply a thin coat of Mod Podge to the top of the altiods can. Apply a thin coat of MP to the back of your paper. Put them together and be really careful to press out any bubbles.
  6. Apply a thin coat of MP to the paper you just put on the Altiods can. Now put some MP on Lucia's back and paste her down.
  7. When she's dry, apply a thin coat of MP over Lucia. When you MP the top coat, always start in the center of the paper and go outwards. If you just paint straight up and down regardless of the edges, you may pull or tear the edges. The top coats will make your doll water resistant!
  8. Now MP your clothing onto the magnet(s). Paint a top coat over the clothes, too. When they are completely dry, cut them out. (One tip: when you're cutting out the ruffled edges, it would be too tricky to cut a ruffle into the magnets. Just cut along the outer edge of the ruffle.)
  9. That's it! The great thing about this project is that there is a built in little compartment to keep the tiny pieces.
I've submitted this post to my first contest! Check out lots of fun ideas of what to make from metal cans!


Monday, April 5, 2010

paper bag mad hatter

At a recent church party, there was an Alice in Wonderland theme and they made these really cute, simple hats out of paper bag so we could be "mad hatters." I thought it was a great idea for kids, too!

Time: 5 minutes + decorating
Skills needed: none
Materials needed: 1 paper bag, decorations

Instructions:
1. Roll down the edge of the paper bag. (This is kind of tricky not to rip it so be careful!) It will naturally get smaller and smaller as you roll. When the hat is the size of your head, stop rolling.
2. optional: tuck in the top corners to give the hat a rounded looking edge
3. decorate with silly stickers, pipe cleaners, and pom poms!
4. Enjoy!
Posted by Picasa