


Monday, November 29, 2010
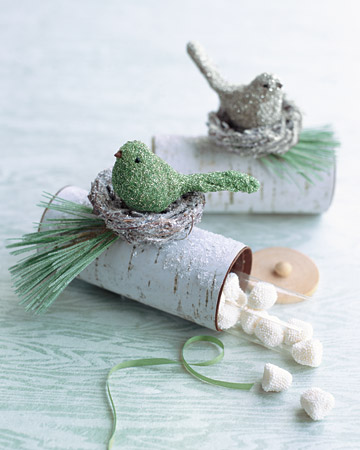
Yule Log Favor Boxes
Snowman Treats
Recently, I was contacted by Heather who has a cute blog called Our Life. She had some great ideas for Recycled toys! This one was pretty brilliant. I love these graduate puffs containers because when you peel off the plastic, you're left with a plain white plastic container. So fun! Check out her website to see how she made this cute Snowman gift container!


Tuesday, October 26, 2010
Coat Hanger fairy wings
Okay, this is a classic that everybody else except me already knew how to do. I'd always hear people say that they made fairy wings out of coat hangers and old tights, but I didn't really get it. Luckily, when Elisabeth decided to be a butterfly for Halloween, I found this great video tutorial. Ours aren't done yet, but they're looking pretty good so far!
Monday, October 18, 2010
Friday, October 8, 2010
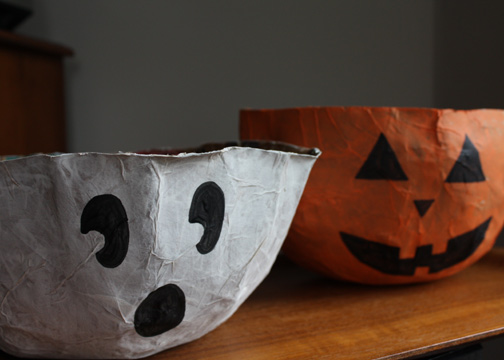
Recycled Halloween Projects
As I perused the internet, I saw lots of great Recycled Toys ideas for Halloween! Here are some of my favorites!
The Long Thread had some great ideas:
Paper bag paper mache pumpkin bowls
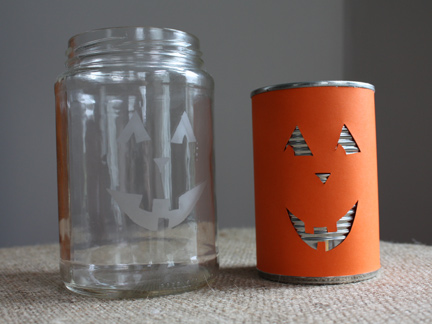
And, of course, Martha came through for us with this cute one: Aluminum can jack o lantern luminaries!
The Long Thread had some great ideas:
Paper bag paper mache pumpkin bowls
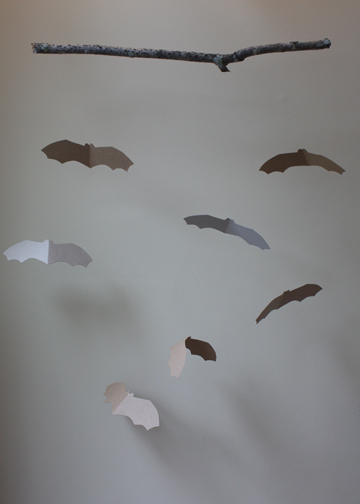
A sweet mobile of bats from the Long thread
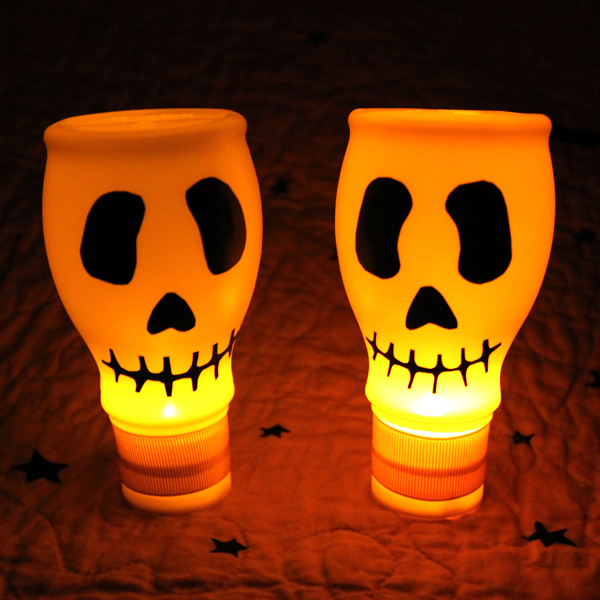
Skull lights made from milk containers, electrical tape, and little lights from dollarstorecrafts.com (This website really rocks, by the way).
And, of course, Martha came through for us with this cute one: Aluminum can jack o lantern luminaries!
Thursday, September 30, 2010
I want your ideas
So, recycled toy ideas are really fun- we all know that! But, sometimes it gets hard to think up and create them on a regular basis for this blog all by myself. But, I know that YOU all have your own fabulous recycled toys projects. I was thinking, wouldn't it be so much more fun to get other people's ideas?!
So, Please, I would love to receive some of your ideas of projects that you've done. Send me an e-mail with the project, what materials you used, how you did it, any other details, and some pictures. Maybe we could even have some spiffy contests down the road! Sound like fun? E-mail me your ideas of recycled toys at iowawildflowers@gmail.com. Fun!
PS- I did my first guest post today at 320 Sycamore, all about how awesome it is to live in Iowa. Head on over if you think you'll enjoy it!
Tuesday, August 31, 2010
Recycled pillow box favors from Skip to my Lou

Monday, July 19, 2010
Book Review: The Big Green Book of Recycled Crafts and Sewing for Children
 I'm not actually endorsed to advertise any books (yea, I wish!), but I thought I'd start passing on really great books to you now and again. This book was full of really great ideas! Not all of them are for kids, but they're all great. Faux stained glass from produce baskets, beautiful flowers from old aluminum cans, checkerboard from old jeans, TV tray made into laundry hamper... there's lots of fun stuff and templates for everything in the back.
Now, being a really cheap, "let's not waste our resources" kind of person, I naturally checked out this book from the library. I highly recommend this method of reading. Public libraries are awesome (although I've never seen one so awesome as the one we have here in Iowa city). Here's my method of craft book "shopping" with a little help from the public library:
- browse amazon for your favorite topics, paying close attention to the "you also might like" section
- Write down the titles you're interested in
- Look them up in the library catalog and A. get them if they have them or B. request them for purchase from your library. (aka, suggest the library buy it so you can read it)
- Enjoy!
Here is my most recent Library requested book:

Okay, now I'm going to sound just like a PBS commercial: So, friends, enjoy these and many, many other wonderful books at your own public library! (for free :)
Saturday, June 19, 2010
WINNERS!
So, for the winners...
I decided to be old fashioned and print out the entries and draw them out of a hat. Since there were two winners, I had each of my kids draw out a paper- I figure they were the least biased because they can't even read yet :)
And the winners are.... (drumroll, please!)
Amy Jean and Andrea!
But, as a surprise, I have a present for EVERYONE who entered! I will be sending a digital copy of the boy doll pattern for FREE to everyone who entered! That way you can make your own! When you make them, please send pictures so we can all see your cute dolls! Thanks for all of your support! Congratulations, winners!
PS- I have e-mailed the "runners Up" prize already. If you entered the contest, but didn't get a runners up prize yet, it's because you didn't tell me your e-mail address. Please e-mail me (iowawildflowers@gmail.com) so I can send one to you, too!
PS- I have e-mailed the "runners Up" prize already. If you entered the contest, but didn't get a runners up prize yet, it's because you didn't tell me your e-mail address. Please e-mail me (iowawildflowers@gmail.com) so I can send one to you, too!
Thursday, June 17, 2010
squirt bottle squirt toy
This is really an easy repurposing. Just wash out an old empty plastic squirt bottle that held ketchup, strawberry syrup, pancake syrup, mustard, chocolate syrup, etc. Then fill it with water and they make great little squirt toy (especially if you don't want your kids too much around play guns). As you can tell, they're really fun! Don't forget to enter the contest. One more day!


Monday, June 14, 2010
paper plate whirligig
Don't forget to enter the Contest to win free toys!
here's an easy craft that they did at a local arts festival here.
 Time needed: 10 min.
Skills needed: scissors
Materials needed:
1. Cut the paper plate in a spiral, starting at the side.
2. Decorate.
3. Punch a hole in the center.
4. Poke a knotted string or yarn strand into the hole
5. Hang and enjoy!
here's an easy craft that they did at a local arts festival here.

Skills needed: scissors
Materials needed:
- paper plates
- scissors
- decorating material (paint, glitter, etc.)
1. Cut the paper plate in a spiral, starting at the side.
2. Decorate.
3. Punch a hole in the center.
4. Poke a knotted string or yarn strand into the hole
5. Hang and enjoy!
Saturday, June 12, 2010
Second place and a prize for you, too!
Dear Friends,
Thanks for all of your support in the Iron Crafter competition! We won second place! As a celebration, we will be having a giveaway! Also, to celebrate, we finally put up a button you can grab and put on your website!------>
For the contest, There will be two winners. Each winner will choose one of the following prizes:

1. A set of four felt bottle cap cupcakes

2. An already made magnetic paper doll toy (you pick boy or girl!)
Here's how you enter:
Make a comment, specifying which prize you would prefer and your e-mail address. If you put our new button on your site, or if you have another link to Recycled Toys from your site, you may enter a second time by leaving a second comment. We will close the contest on Friday the 18th when two random winners will be chosen!Thanks again!
PS- to put the button on your blog, go to the layout and add an HTML gadget. Just copy and paste the text from my text box on the right column--------> into your HTML gadget box. Then save and test it to make sure it works!
CONTEST CLOSED... STAY TUNED FOR WINNERS!
Friday, June 11, 2010

Thursday, June 10, 2010
Magnetic paper doll toy BOY
Thank you, friends, for all of your votes in the Fireflies and Jellybeans contest this week. There is still one more day to vote so please vote if you haven't! (I'm currently in second place!)
I had my little "Lucia" magnetic dolls at church the other week. Our best friends were sitting on the pew in front of us and I let their son, Alex, play with Lucia and he loved it! That's when I decided that we really needed a version for the boys. This one is less centered around mix and matching outfits and more about all the fun things he could do or become! I hope y'all enjoy it as much as we have!
This is also the beginnings of my first Etsy shop, over here --->
Hopefully we'll get some more items listed soon!
Thanks again for all of your support! There may be a special celebration in order tomorrow!


Tuesday, June 8, 2010
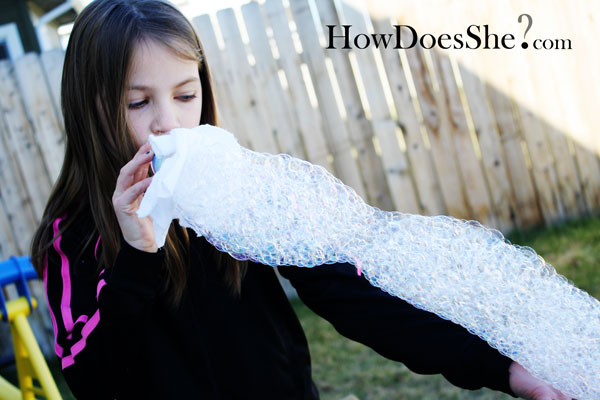
homemade bubble blower
Here's a really fun homemade bubble blower idea from Skip to my Lou from How does She. It's made from a water bottle and an old rag or sock. Enjoy!
Monday, June 7, 2010
iron crafter competition
I made it to the top 10 of the iron crafter competition! Cast your vote here http://firefliesandjellybeans.blogspot.com/
Wednesday, June 2, 2010
Juice box boats
I saw this great idea on another blog I love to read. I can't wait to build one and have a race!
The idea is from Inchmark and was featured in Parenting magazine, I believe!

The idea is from Inchmark and was featured in Parenting magazine, I believe!
iron crafter competition
I've entered my first competition! My sister told me about this contest for making things with old cans and she thought that Lucia would be great. So, you can go over there and check out all of the cool things people submitted!

Also, hopefully soon you will be seeing a masculine version of the Altoids can doll! I can't wait!
Also, hopefully soon you will be seeing a masculine version of the Altoids can doll! I can't wait!
Thursday, April 29, 2010
Recycled toys rock band
My daughter kinda wants to be a rock star. I'm kinda okay with that since I'm a singer and a lover of music. And, she looks cute in the shades. Here are a couple of Musical instrument ideas, but I'm sure there are more to follow.
End of easter Musical Shaker
Put some dried beans in those old eggs and give them a new life! (You can tape them up of you're afraid of a mess or little ones eating choking on them)

End of easter Musical Shaker
Put some dried beans in those old eggs and give them a new life! (You can tape them up of you're afraid of a mess or little ones eating choking on them)


Friday, April 23, 2010
Lucia's print out
 Here is your belated Earth Day present. To use this picture for your altiods can, save the image to your computer and print it out to be 8 1/2 by 11. That way, Lucia will be just big enough to fit on the can's front. I know she looks homemade (because she is), but I hope you love her as much as we do!
Thursday, April 22, 2010
Altiods can magnetic paper doll- Happy Earth Day!

Dear Readers,
Happy Earth Day! Earth day is one of our family's favorite holidays! For my Earth Day gift to you, I am going to give you my best recycled toy idea yet! (And hopefully soon it will come with a template!) This would be the perfect toy to keep in your purse for Errand Emergencies when kids need a little extra entertainment. It is a magnetic dress-up doll with its own built in carrying case! I'll have to warn you, though, that I learned some Mod Podge lessons the hard way and my paper got bubbly and torn. I'm sure yours will turn out better!
Magnetic Paper doll with Altoids can case

Skills Needed: coloring, cutting
Time needed: an hour
Materials needed:
- empty and clean Altoids can
- unwanted flat magnets (the kind that businesses use to market themselves are perfect. About the size of the business card and very cuttable.)
- crayons or colored pencils
- Mod Podge
- scissors
- paint brush
- scrap of fun paper the size of the top of the Altoids can
- Print out of Lucia or another paper doll you love that is 3 1/2 inches tall
 Instructions:
- print out "Lucia" my handmade paper doll or shrink your own favorite paper doll to be around 3 1/2 inches tall(To print out Lucia, save the picture here to your computer, then print at full page size).
- Color in her beautiful clothes. Use crayons or colored pencils, but don't use washable markers because they'll bleed when you put on the Mod Podge later. And don't use permanent markers because they just bleed. Don't worry if the colors go outside the lines because you'll be cutting them, anyway. (Can you tell that my 3 year old painted the mermaid tail?) Design more if you're feeling extra creative!

- cut Lucia out on the lines. Cut her clothes out loosely, leaving a little white space around the edges.
- Trace the top of the altoids can onto the back side of your scrap of pretty paper. Make sure there's not any overhang.
- apply a thin coat of Mod Podge to the top of the altiods can. Apply a thin coat of MP to the back of your paper. Put them together and be really careful to press out any bubbles.

- Apply a thin coat of MP to the paper you just put on the Altiods can. Now put some MP on Lucia's back and paste her down.
- When she's dry, apply a thin coat of MP over Lucia. When you MP the top coat, always start in the center of the paper and go outwards. If you just paint straight up and down regardless of the edges, you may pull or tear the edges. The top coats will make your doll water resistant!

- Now MP your clothing onto the magnet(s). Paint a top coat over the clothes, too. When they are completely dry, cut them out. (One tip: when you're cutting out the ruffled edges, it would be too tricky to cut a ruffle into the magnets. Just cut along the outer edge of the ruffle.)

- That's it! The great thing about this project is that there is a built in little compartment to keep the tiny pieces.


Monday, April 5, 2010
paper bag mad hatter
At a recent church party, there was an Alice in Wonderland theme and they made these really cute, simple hats out of paper bag so we could be "mad hatters." I thought it was a great idea for kids, too!


Time: 5 minutes + decorating
Skills needed: none
Materials needed: 1 paper bag, decorations
Instructions:
1. Roll down the edge of the paper bag. (This is kind of tricky not to rip it so be careful!) It will naturally get smaller and smaller as you roll. When the hat is the size of your head, stop rolling.
2. optional: tuck in the top corners to give the hat a rounded looking edge
3. decorate with silly stickers, pipe cleaners, and pom poms!
4. Enjoy!
Wednesday, March 10, 2010
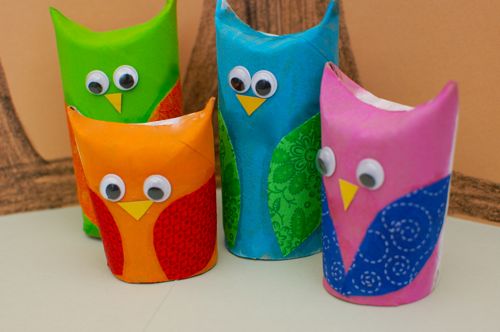
TP Castle
 Skills Required: scissor skills and creativity (medieval architecture skills would help, too...)
Time Required: 15 minutes, plus painting
Materials:
A bunch of Toilet paper rolls, Paper towel rolls, and any other paper cylinder you can find.
a scrap or chipboard (cereal box, etc.)
Scissors
Tape or hot glue
Instructions:
1. Cut the tops of each roll with castle tower-top design. I did ten slits and then cut off every other square.
2. Paint the Castle your desired colors (I did this after assembly, and it was really difficult to paint in the corners)
3. Arrange the rolls like a castle. I had a hard time with this at first, but then I just thought, if it were my castle, I'd want high walls all around with several higher towers as well. So, I just put mine mostly in a circle, then put some small ones resting above and to the side of others. Do it however you like, though! Leave a gap in the middle front for the drawbridge.
4. Cut a piece of chipboard to be about the height of your walls. Cut out doors in the front center.
5. Tape or hot glue it all together. Hot glue would be more sturdy, but Tape was our choice so that the kids could help.
6. Play! of course, my Daughter was way better at decorating the castle than me! (and I promise she's never seen the Monty python where they launch livestock off the towers!)

Thursday, February 18, 2010
milk jug helmet
 Time needed: 10 minutes plus 15 minutes optional paint time
Skills needed: scissor skills
Materials needed:
- milk jug
- scissors
- acrylic paint
- paintbrush
Super easy: Cut off the handle side of the milk jug. We had a hard time cutting it so it would fit over their heads even though the book I followed had a photo with kids heads fitting easily. In one of the helmets, I cut a curved slit in the back to make it more roomy.
Paint the helmet to any look you want. My daughter did a "princess" helmet. You could do camo, Army, NASA, etc.
Have fun!
Wednesday, February 10, 2010
milk jug "scoops" catch game

Time needed: 15 minutes
Skills needed: cutting
Materials needed:
- 2 clean used plastic milk jugs
- scissors
- tennis ball, bean bag, or wrap up old tape, rubber bands etc. to make your own ball

This idea is one we found in this wonderful book, EcoArt Earth-Friendly Art and Craft Experiences for 3 to 9 year-olds. This book is full of great recycled toy ideas!

Instructions:
1. Trace the shape of how much you want to cut off. We found it best to cut it starting an inch or two below the handle, with a oval that extended until the tip of the corner. (You may need to play with it. If you leave just a little lift at the end, it helps the ball or bean bag lift into the air, but if you leave too much on the end, it will hinder the ball from coming out!)
 2. Start your cutting hole right in the center of the piece you will discard. Cut along your line.

To play, Use like mini underhand lacross sticks. Play catch and have fun trying to catch your ball in the scoop!
Subscribe to:
Posts (Atom)